LinkedIn Sumbreak · puzzle #1
LinkedIn Sumbreak Puzzle #1 Answer (18 November 2026)
Starting board
- 1
- 1
- 64
- 4
- 2
- 32
- 4
- 4
- 16
View starting-board diagram
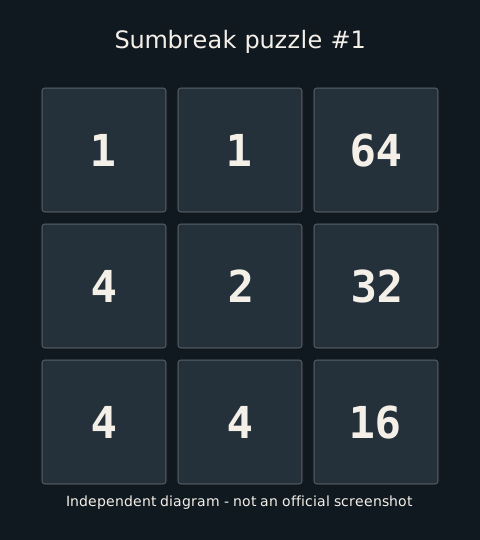
Nine tiles, one total: 128. On this plain-number board, a completed route ends on the sum of the starting numbers.
-
1
Top row: drag the 1 in row 1 column 1 right onto the 1 in row 1 column 2 — a 2 in column 2.
The only matching pair in the top row.
-
2
Drag that 2 (row 1, column 2) down onto the 2 in the centre (row 2, column 2) — a 4.
Puts a 4 where the 4 in row 2 column 1 can reach it.
-
3
Drag the 4 in row 2 column 1 right onto the 4 in the centre — an 8.
The centre becomes the working square.
-
4
Bottom row: drag the 4 in row 3 column 1 right onto the 4 in row 3 column 2 — an 8.
Second 8, one square from the centre 8.
-
5
Drag the 8 in the centre down onto the 8 in row 3 column 2 — a 16.
The 16 lands next to the 16 in the bottom-right corner.
-
6
Drag that 16 (row 3, column 2) right onto the 16 in row 3 column 3 — a 32.
The 32 now sits directly under the 32 above it.
-
7
Drag the 32 in row 3 column 3 up onto the 32 in row 2 column 3 — a 64.
A second 64, directly below the corner 64.
-
8
Drag that 64 up onto the 64 in row 1 column 3 — 128, done.
64 + 64 = 128, one tile left.
0 of 8 merges revealed — no moves shown
LinkedIn's Sumbreak puzzle #1, 18 November 2026 — the first board of the series. One order that finishes it; a board can have more than one route.
Open the full move table (spoilers)
R means row and C means column. Rows run top to bottom and columns run left to right. A dash marks an empty square. The three groups under Board are the three rows after that move.
| Step | From | To | Result | Board after the move |
|---|---|---|---|---|
| 1 | R1 C1 | R1 C2 | 2 | — 2 64 / 4 2 32 / 4 4 16 |
| 2 | R1 C2 | R2 C2 | 4 | — — 64 / 4 4 32 / 4 4 16 |
| 3 | R2 C1 | R2 C2 | 8 | — — 64 / — 8 32 / 4 4 16 |
| 4 | R3 C1 | R3 C2 | 8 | — — 64 / — 8 32 / — 8 16 |
| 5 | R2 C2 | R3 C2 | 16 | — — 64 / — — 32 / — 16 16 |
| 6 | R3 C2 | R3 C3 | 32 | — — 64 / — — 32 / — — 32 |
| 7 | R3 C3 | R2 C3 | 64 | — — 64 / — — 64 / — — — |
| 8 | R2 C3 | R1 C3 | 128 | — — 128 / — — — / — — — |
Where the second 64 comes from
All nine starting numbers add to 128. On this plain-number board, the final move has to join 64 and 64. The original 64 begins at the top right. In this route it waits there while the right-hand column builds another 64 directly below it.
The left side supplies the smaller merges. Move the two top-row 1s so the 2 stays in the top-middle square. It can then move down onto the centre 2. The 4 this creates needs to stay beside the 4 in the middle-left square. Bring that left 4 into the centre and you have one of the 8s needed in the next phase.
How to get from the centre to the right edge
The bottom-left 4 can merge right into the bottom-middle 4 before or after you build the centre 8. Both orders leave the two 8s one step apart. Drop the centre 8 down into the bottom-middle square. That puts a 16 to the left of the original bottom-right 16.
Merge those two 16s into the bottom-right square and then move the new 32 up. The middle-right square becomes the second 64. The two 64s now touch. Either destination in that final pair leaves one tile. The table above follows the route that finishes in the top-right square.
If the two 8s won't meet
Check whether the bottom 4s merged towards the bottom-left corner. That leaves their 8 diagonal from the centre and empties the square between it and the right side. Restore the move before that choice and keep the result in the bottom-middle square. You can use the move table to pinpoint the first state where your board differs.
A different valid route can finish in a different square. If you have one tile left, the result should still be 128. Read the archive for other boards or use the rules guide to check what counts as an adjacent square.